Monday, July 6, 2009

How to Manage Colors for Beautiful Prints

How to Manage Colors
for Beautiful Prints


Have you ever faced this problem? Let's say you took a bunch of great photos during your last vacation.

You get home, upload the snaps to your PC, then print them using your trusty color printer, hoping to get the dazzling printouts you desire. And guess what? The prints aren't
quite as breathtaking as you'd like.

One big challenge with printing digital photos at home is color management.

You need to understand that your computer monitor and print paper are completely different media. Hence, your print isn’t going to be an exact match of what you see on your screen.

Here are some tips on color management to ensure that you get great quality photo prints.

Monitor Calibration

Here's another tip - it's important to calibrate the colors displayed by your computer monitor. Most good computer monitors come with some sort of color management software. If you're looking for some products, some that I'd recommend are ColorVision Spyder2 and Color Profile Mechanic .


Understanding Color Space

When choosing a color space for image editing, there are two major types. One is the Adobe RGB (1998) and the other is sRGB. My advice is to be consistent with the color space you choose. If you took the picture with sRGB in your digital camera, then follow through with sRGB when working with them in your image-processing program. Many professionals prefer the Adobe RGB format though, as it gives them a wider range of colors. Experiment and see which color space works for you.


Printer Driver

You need to ensure that your printer driver is up-to-date. Also, when printing your photo, choose your printer properties and ensure that the correct photo quality and paper size have been selected.


Paper Quality

One of the most critical requirements for a quality printout is the quality of paper you use. Make sure you specify to your printer what type of paper you’re using - it needs this information in order for it to properly apply ink.

A Simple Trick for Copying Textures between Photos

A Simple Trick for Copying Textures between Photos


Hey, have you ever wondered if you can get really creative and manipulate reality using your digital photography skills?


Well, I recently took a shot of a lighthouse and thought it might be interesting to paint some kind of special texture on it.

The resulting photo was awesome, as you can see below. See how those flowers appear on the lighthouse wall? Curious how this was done? Well, read on and find out!


The result of copying a texture from one photo to another


Step 1: Selecting The Canvas

Before we start, you may want to download the tutorial pictures. There are two of them, one is the original lighthouse photo and the other is a photo of some wild flowers.

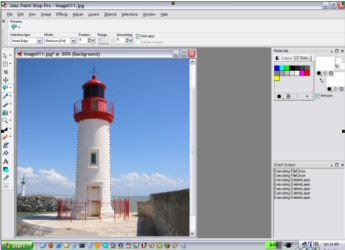
Now, once you have the photos, the first thing to do is to load up your trusty image editor. For this tutorial, I'll use Paint Shop Pro. Open the photo of the lighthouse and select the Freehand Selection tool, which we will use to ensure that any painting is only done on the wall of the lighthouse.

Locate the Freehand Selection tool in the fifth cubby of the toolbar on the left side of the screen. Make sure you can see the Tool Options palette at the top of the screen; you can toggle it on by choosing View, Palettes, Tool Options. Then set the Freehand Selection tool to Smart Edge from the Selection Type drop-down menu.


Selecting the canvas onto the which the texture will be painted


Select the entire wall area with the tool. To do that, click on the edge of the hood, move the cursor a short distance, then click again. Follow this process until it's completely selected, then double-click to close the loop.


Step 2: Add the Texture

Now select the picture of wild flowers and switch to the Clone Brush. This useful tool resides in the eighth cubby from the top of the toolbar. In the Tool Options palette, set the size of the brush to about 45 pixels and make the Opacity pretty low, about 30 percent. The opacity should be set low so that we can still see the underlying texture of the wall in the resulting photo.

Step 3: Start Painting

Right, now you can start to paint the lighthouse photo. Right-click on the wild flowers to select your starting point. Now switch to the lighthouse photo and position the mouse at the point that you'd like the flowers to appear. When you're ready, just click and paint, covering the entire wall in one stroke.

When you're done, click on the Freehand Selection Tool again and right-click in the picture to eliminate the selection outline. If you like the results, save the picture.

Conclusion

Ok, we're all done for this short tutorial. I hope you've learnt some tips on applying textures to photos. One way to get different results is to try varying the opacity of the painting. You can also use a larger or smaller photo for the texture to get different effects.

How to Choose a Tripod for Your Digital Camera


How to Choose a Tripod for Your Digital Camera

Are you thinking of getting a digital camera tripod?

Well, good for you! I feel that tripods really are a necessity if you’re serious about photography. Yes, they are big, bulky and quite painful to carry around - but they do wonders for the digital photos.

They are particularly good for getting rid of that camera shake that creeps into your photos now and then.


In particular, tripods are particularly good for nature shots, macro-photography, long exposure shots, slow shutter speeds or low light situations. That makes it a very versatile accessory which must be in any photographer's toolbox.

This article will give you some tips for choosing a good tripod for your digital camera. Read on and find out more!


Check the Stability

Always make sure you check stability of the tripod when the legs are fully extended. Adjust the tripod to a proper height, then check if it wobbles after you apply some pressure to the top. If the tripod is made of sturdy material and is of good quality, it should remain firmly in place even with some pressure on it.


Can It Sustain the Camera's Weight?

Another thing to bear in mind when buying a tripod is the weight of your camera. Remember, if you have a professional digital SLR, the total weight of your camera, lenses and flash unit will make the whole setup pretty hefty. Make sure that tripod can carry the total load.

In general, I'd avoid the plastic models. Yes, they’re lightweight and cheap, but you want to trust it with your camera. A heavy tripod, made of magnesium alloy, titanium or carbon fiber is much better. Though slightly more costly, they will last you a long time and are much suited for rough photographic situations.


Check the Head

Tripods come with a head to which your camera is attached. Some of the tripods come with one that’s removable, which will allow you to just buy whichever type you like. Some come with one that is not removable, and your stuck with it. So shop carefully.

Heads tend to come in two categories - the pan and tilt heads and the ball and socket heads. Both have advantages and disadvantages. The pan and tilt heads move up and down, left to right. The ball and socket type allow you to position the camera in any direction, is nice for moving your camera around while on the tripod.


Check the Height

One more thing - remember to check for the height of the tripod. How does the tripod extend? What are its maximum, minimum and folded heights? And most importantly, do the heights fit you? This can really vary depending on the type of photographs you take.


Brand Name Tripods

There are many brands of tripods out there - many beginner digital photographers end up buying lower quality ones. Remember, a cheaper price doesn't always mean the tripod is of a better quality. I prefer to go for quality brand names like Sunpak, Slik or Vanguard. One of my favorite tripods for general usage is the I use is the Sunpak 6601UT tripod as shown below.


The Sunpak 6601UT Tripod


Conclusion

Great! Hopefully you've now learnt a thing or two about choosing a proper tripod for your digital photography exploits. Trust me, a tripod is a really useful tool - something that you will need sooner or later if you're serious about photography.